If you’re new to smoking meats, you might be a little daunted by baby back ribs. But while it can take a little while to get used to, there is one surefire method that should help you cook the perfect ribs even if you don’t have heaps of experience.
The method in question is the 2-2-1 method. The numbers in the name refer to the time your ribs will be spending on the grill. The cooking is broken down into (can you guess?) three stages. The following article will outline these three stages, as well as everything else you might need to know about smoking baby back ribs.
What Are Baby Back Ribs?
The reason they’re called baby back ribs isn’t because they come from baby piglets. It’s actually because the ribs come from the upper spinal part of pigs (fully grown pigs, we might add), and they’re smaller than spare ribs. They’re also sometimes referred to as loin back ribs, or just back ribs.
What Is The 2-2-1 Method?
The 2-2-1 refers to the timings you should stick to when smoking ribs. The first stage is smoking ribs unwrapped for two hours, the second stage is wrapping the ribs in foil and smoking them for a further two hours, and in the final stage, you remove the foil from the ribs and cook them for one more hour.
The 2-2-1 method is so ideal for baby back ribs because they contain less fat than other ribs, like spare ribs, and 2-2-1 is the best way to avoid the meat becoming too dry.
It’s important to remember that your ribs probably won’t be done after exactly five hours every time, especially if the ribs are especially large. There are a lot of variables when it comes to knowing whether your ribs are ready.
Some barbecuers look down on the 2-2-1 method when it comes to smoking baby back ribs, but the technique usually works perfectly, and is ideal for someone new to smoking meats.
The 2-2-1 Method Explained
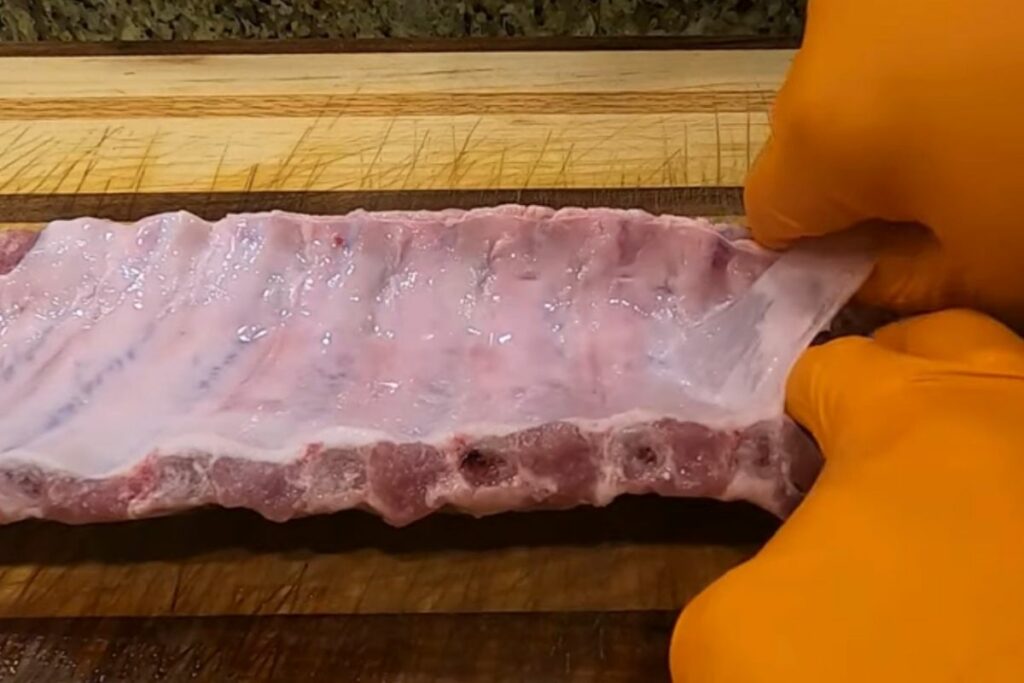
First, remove the membrane from the ribs, and trim any excess fat. Rinse the ribs with cold water and dry it off using paper towels. Your smoker should be set to 225 degrees Fahrenheit.
If you’re using a charcoal grill, you should build a medium-low fire with one side of the chamber free of coal, and place the ribs over the section of the grill where the heat is indirect.
Mix together a small bowl of brown sugar, kosher salt, cumin, ground black pepper, onion powder, and garlic powder. You can also slather the ribs with a light layer of mustard, as this will help your prepared seasonings to adhere when you coat the ribs with them, which is the next step. If you don’t add mustard, the seasonings might stick to the cooking grates, rather than the meat.
If you’re not a big fan of mustard and you’re reluctant to slather your meats with it, there’s nothing to worry about, because by the time your ribs are cooked the taste of the mustard will be all but gone. You don’t need to get some fancy high-end mustard, either. The standard mustard you can buy at the store will do just fine.
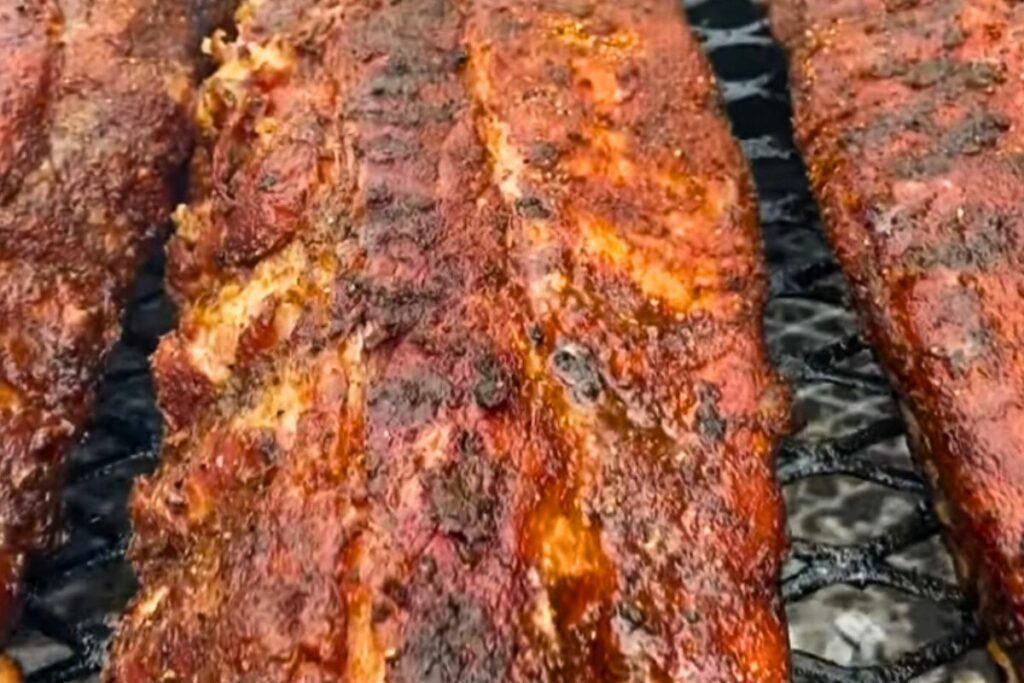
Then, place the ribs bone side down on the smoker and close over the lid, and it’s time for the first ‘2’. Let your ribs smoke for two hours, without any interference.
Before those first two hours are done, lay out a sheet of aluminum foil (you might need two layers if the foil is of the thinner variety). Add two teaspoons of honey to the foil’s center, as well as two teaspoons of sweet chilli sauce and a tablespoon of melted butter.
When the ribs have had their first two hours, remove them from the smoker and lie them on the foil bone side down. Fold the foil around the ribs and seal them tight before putting them back in the smoker.
The next step should be two more hours, or until the meat is easily sliding off the bone. At this stage you can use a number of methods to find out if the meat is ready (which we detail in full below).
One method would be the toothpick method. Slide a toothpick between the ribs, and if it slides in easily without any resistance, your ribs are probably cooked.
Unwrap your ribs using oven mitts, and be wary of escaping steam. Reserve the juices that have been left behind in the foil. Now, put the ribs back in the smoker again, directly on the cooking grates. Use the cooking juices from the foil to baste the meat.
At this stage, you can up the temperature to 350 degrees Fahrenheit if you prefer your ribs crispy. If you’re using a charcoal grill this is just a case of adding some more coal to the fire. Let the ribs cook for another hour, basting them roughly every ten minutes.
You can also apply a layer of barbecue sauce while the ribs are in their final 30 minutes of cooking. Once you’ve removed the ribs from the smoker, give them between 10 to 15 minutes before serving.
Recommended Ingredients For 2-2-1 Baby Back Ribs
The recommended ingredients for the perfect 2-2-1 baby back ribs are as follows:
1 rack of Baby Back Pork Ribs (obviously, right?)
A quarter cup of brown sugar
1 tablespoon of Kosher salt
1 tablespoon of paprika
2 teaspoons of onion powder
2 teaspoons of garlic powder
2 teaspoons of ginger
Half a teaspoon of black pepper
Half a teaspoon of oregano
A quarter teaspoon of cayenne pepper
Mustard
A ¾ cup of rib glaze
How Do I Know When My Ribs Are Ready?
The aforementioned methods for telling when your ribs are done include the bend test, the twist test, the peek-a-boo test, the taste test, the toothpick test, and the pop-up test.
The Bend Test (Also Known As The Bounce Test)
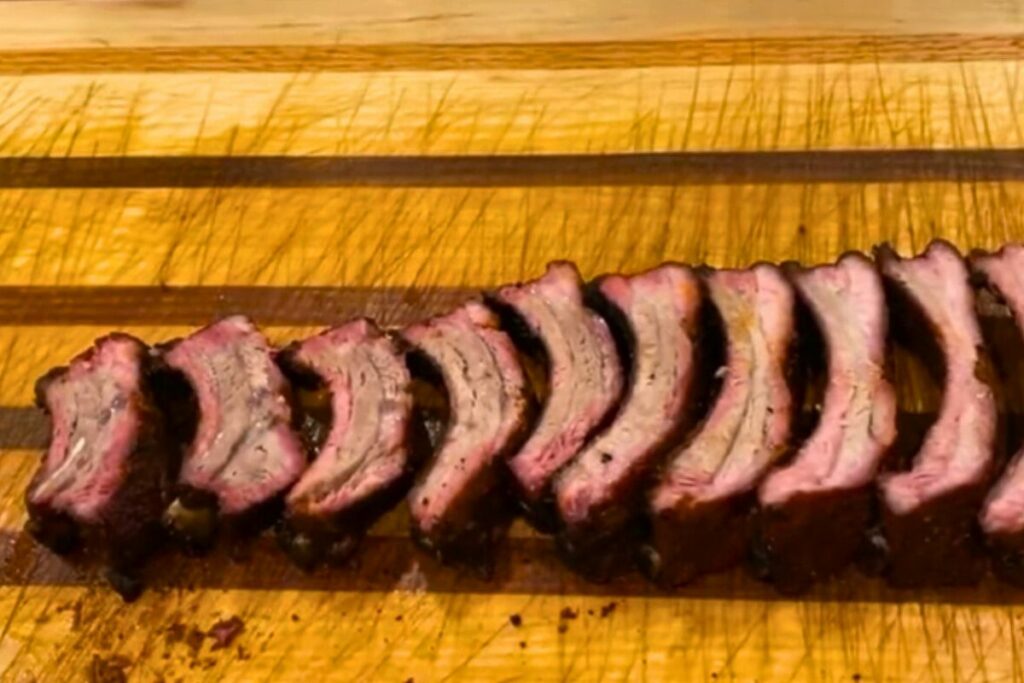
The bend test is probably the most popular method on this list. All it involves is picking up the ribs with tongs. If the meat cracks more than just a little, and appears to be breaking free from the bones quite easily, then you can be sure your ribs are either well on their way or properly cooked.
If the crack in the rack is only small, then you should be giving the ribs a little longer. It’s a method that takes a little practice, but once you’ve mastered it, you should be onto a winner every time.
The Twist Test
Possibly the quickest and easiest test of the bunch, the twist test involves simply cutting a piece of the ribs, and holding it tight in the middle. Twist it gently, and if the meat is breaking off the bone easily, that’s an indication that it’s either finished cooking or almost finished cooking. The bone you chose isn’t really presentable to guests anymore… but you can have that one.
The Peek-a-boo Test
A visual test, this involves cutting the meat open when you think they’re close to fully cooked, and having a look inside. If the middle is white or tan, the ribs are nearly done. If there’s any pink parts in the middle of the meat, those are blood spots, and the ribs need more time to cook.
Pink parts near the edges are normal, though, especially when smoking. It’s not a perfect method, but it does help to give those new to smoking a better understanding of when meat is ready.
The only downside to this method is that once you’ve cut into the meat, the flesh is now exposed, and if the ribs aren’t actually ready yet it could mean that this part of the meat will cook faster than the rest, and possibly dry out. This shouldn’t be a major problem, though, if you’ve wrapped the ribs in aluminum foil.
The Taste Test
This test simply involves cutting off a piece of meat and tasting it. If the meat is tender and flavorful, it’s most likely done. It goes without saying, obviously, but you should only be using this method if you’re already confident that the meat is probably done- else you risk eating uncooked meat, which is never ideal!
The Toothpick Test
A method many have been using for years is the toothpick method. This is one of the quickest and easiest ways to determine how cooked your ribs are.
Simply insert a toothpick into the flesh between the ribs, and if there’s very little to no resistance, then that particular part of the meat is cooked.
To be on the safe side, you should be poking multiple parts of the rack, as the thickness of flesh can vary. This is an ideal method because while it does involve disturbing the meat somewhat, you’re not going so far as to break a piece off.
The Pop-up Test
Another visual test, this method is quite popular with experts. The theory of the pop-up test is that when the meat starts pulling back from the bone of the rack, this means that the ribs are done or nearly done. Those who use this method usually look for about one quarter of an inch of the bone to be exposed.
While this may seem like an ideal test because it doesn’t interfere with the meat (so all of the meat will remain cooking evenly), it’s not entirely reliable. The meat of some stacks can start shrinking towards the bone after as little as an hour, if the temperature is high enough.
This can happen even when the meat is nowhere near cooked properly. Also, if you prefer to smoke at a lower heat (somewhere closer to 225 degrees Fahrenheit), it might mean that the meat won’t shrink from the bone until far later.
If you’re relying on the pop-up test in this instance, it might mean that by the time you take the ribs off the heat, they’ve been overcooked.
So, probably best to use one of the physical methods when trying to decide whether your ribs are done or not, even if it means disturbing the meat.
Conclusion: Smoking Baby Back Ribs 2-2-1
While some barbecuers argue that smoking baby back ribs using the 2-2-1 method cuts a few too many corners, it’s perfect for helping beginners get used to the smoking process.
You shouldn’t be sticking to the designated timings religiously; a variety of factors, such as the thickness of the flesh and the heat of your smoker, affect the overall time it takes to cook ribs. But using 2-2-1 as a guide, even loosely, is a fairly foolproof way to get your ribs just so.